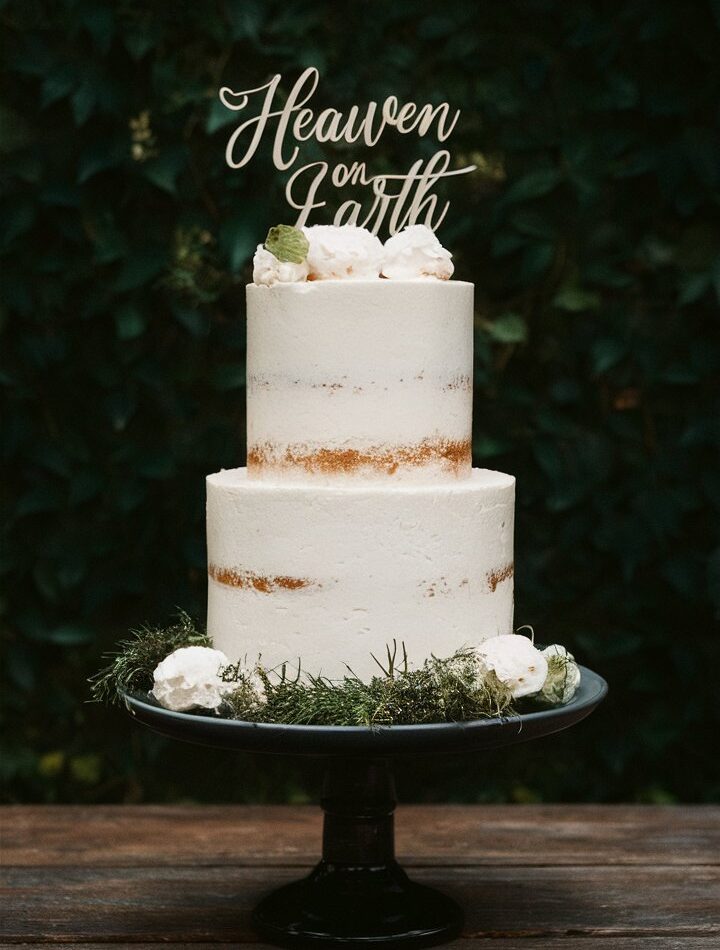
Desserts are the heart of every joyful gathering, and few sweet creations are as irresistibly creamy, light, and satisfying as the iconic Heaven on Earth Cake. Known for its cloud-like texture and rich flavor profile, this dessert combines fluffy angel food cake, creamy vanilla pudding, tangy cream cheese, whipped topping, and a glossy cherry pie filling into a no-bake masterpiece that tastes like a slice of paradise.
In this comprehensive guide, we’ll explore everything you need to know about Heaven on Earth Cake—from its origins and ingredients to step-by-step instructions, customization tips, expert techniques, and make-ahead strategies. Whether you’re preparing for a potluck, holiday celebration, or simply craving a chilled treat during the summer, this no-fuss recipe will become a staple in your kitchen.
🧁 What Is Heaven on Earth Cake?
Heaven on Earth Cake is a no-bake layered dessert made with cubed angel food cake, a luscious vanilla pudding and sour cream mixture, a rich cream cheese whipped topping, and a crowning layer of cherry pie filling. The dish is chilled until the flavors meld beautifully, delivering a cool, creamy, and fruity dessert that tastes indulgent but feels refreshingly light.
The name isn’t an exaggeration—it truly tastes like something that might be served in dessert heaven.
💖 Why You’ll Love This Cake
Here’s why this dessert earns a permanent place in your recipe collection:
- No baking involved: Ideal for summer or when you don’t want to heat up the kitchen.
- Simple layering technique: No fancy equipment or pastry skills required.
- Crowd-pleasing flavor: A dreamy blend of tangy, creamy, sweet, and fruity in every bite.
- Make-ahead friendly: Tastes even better the next day.
- Easily customizable: Use different pie fillings or flavor variations.
- Perfect for every occasion: Picnics, potlucks, holidays, or weeknight dessert cravings.
🛒 Ingredients Overview
Let’s break down what you’ll need to make this dreamy dessert. We’ll also explore some variations and substitutions later in the article.
🎂 Core Ingredients:
| Ingredient | Purpose |
|---|---|
| Angel food cake | Acts as the fluffy base that absorbs the creamy layers. |
| Vanilla pudding mix | Adds a rich, sweet custard-like layer. |
| Cold milk | Used to mix with the pudding and achieve a silky texture. |
| Sour cream | Balances the sweetness with a gentle tang. |
| Cream cheese | Introduces a rich, velvety texture to the topping. |
| Whipped topping (e.g., Cool Whip) | Makes the topping light, airy, and easy to spread. |
| Cherry pie filling | Provides a tart, fruity topping that contrasts beautifully with cream. |
👩🍳 Step-by-Step Recipe Instructions
Step 1: Prepare the Angel Food Cake
You have two options for the base layer:
- Use store-bought angel food cake – Simply cut it into bite-sized cubes using a serrated knife.
- Make it from a box mix or from scratch – Let it cool completely before cutting into cubes.
✨ Pro Tip: A serrated knife helps keep the cake fluffy and prevents it from compressing.
Step 2: Mix the Pudding Layer
In a mixing bowl:
- Whisk 2 small boxes (3.4 oz each) of instant vanilla pudding mix with 3 cups of cold milk.
- Whisk for 2–3 minutes until the mixture thickens.
- Fold in 1 cup of sour cream to add richness and subtle tang.
Set aside once the mixture reaches a smooth consistency.
Step 3: Create the Cream Cheese Layer

- In a large bowl, beat 8 oz softened cream cheese until smooth and creamy.
- Gently fold in 1 (8 oz) container of whipped topping using a rubber spatula.
- Stir until fully combined but keep the texture light and airy.
Step 4: Assemble the Layers
Grab a 9×13-inch glass baking dish. Begin layering:
- Bottom layer: Half of the angel food cake cubes.
- Second layer: Half of the vanilla pudding mixture.
- Third layer: Half of the cream cheese/whipped topping blend.
Repeat:
- Fourth layer: Remaining cake cubes.
- Fifth layer: Remaining pudding mixture.
- Sixth layer: Remaining cream cheese mixture.
Step 5: Top with Cherry Filling
- Gently spread 1 can (21 oz) of cherry pie filling over the top layer.
- Spread evenly for full coverage and visual appeal.
🌟 Optional: Sprinkle with chopped almonds or pecans for crunch.
Step 6: Chill Before Serving
- Cover with plastic wrap and refrigerate for at least 4 hours, preferably overnight.
- The chill time helps the flavors meld, creating a unified, dreamy texture.
🍒 Variations and Flavor Twists
Want to make it your own? Here are delicious flavor variations:
1. Berry Bliss Version
- Swap cherry pie filling for blueberry, raspberry, or strawberry.
- Use mixed berry compote for a more artisanal twist.
2. Tropical Heaven
- Use pineapple or mango chunks with a tropical glaze.
- Add shredded coconut and swap vanilla pudding with coconut cream pudding.
3. Chocolate Dream
- Use chocolate pudding instead of vanilla.
- Top with chocolate shavings and mini chocolate chips.
4. Lemon Delight
- Use lemon pudding and a thin drizzle of lemon curd.
- Garnish with fresh mint or thin lemon slices.
🧠 Expert Tips for Success
- Chill time is key: Always chill overnight for best texture.
- Don’t overmix the whipped topping—it should remain fluffy.
- Use a glass dish for a stunning visual presentation of the layers.
- Fresh fruit topping? Add it just before serving to avoid sogginess.
- Make mini versions: Use mason jars or parfait cups for individual servings.
🧼 Storage and Make-Ahead Instructions
| Storage Method | Duration | Notes |
|---|---|---|
| Refrigerated | 3–4 days | Keep tightly covered with plastic wrap. |
| Frozen | Not recommended | Cream and pudding textures may separate. |
| Make-Ahead | Up to 24 hours | Ideal for prepping before events. |
🥄 Serving Suggestions
Serve cold directly from the refrigerator. Here are some fun serving ideas:
- With fresh whipped cream on top for added decadence.
- Garnished with fresh mint leaves for a pop of color.
- With a drizzle of caramel or chocolate syrup for indulgence.
- Alongside coffee or iced tea for a complete dessert pairing.
❓ Frequently Asked Questions (FAQ)
1. Can I use other types of cake?
Yes. Sponge cake, vanilla loaf cake, or pound cake all work well, though angel food cake offers the lightest texture.
2. Can I make it sugar-free?
Absolutely. Use:
- Sugar-free pudding mix
- Light or fat-free cream cheese
- Sugar-free whipped topping
- No-sugar-added pie filling
3. Can I use Greek yogurt instead of sour cream?
Yes! Greek yogurt is a great protein-rich substitute that adds a tangy flavor.
4. How can I make it nut-free?
Simply skip any almond or pecan toppings. Always check ingredient labels for processed goods.
5. What’s the best way to cut and serve?
Use a large serving spoon for scooping or a sharp knife for slicing. Wipe the knife clean between cuts for neat portions.
📌 Pinterest-Worthy Pin Description (SEO Optimized)
“This easy Heaven on Earth Cake is the ultimate no-bake dessert! Fluffy angel food cake, creamy pudding, and cherry topping come together in the most heavenly layered treat. Perfect for summer parties, potlucks, or late-night cravings! #HeavenOnEarthCake #NoBakeDessert #EasyDessertIdeas”
🧾 Printable Recipe Card
📝 You can insert a recipe card here using a plugin if on WordPress or export as PDF for downloadable format.
🏁 Final Thoughts: Why Heaven on Earth Cake Is a Must-Try
Heaven on Earth Cake is more than just a quick dessert—it’s a beautiful combination of texture and flavor that feels indulgent but is incredibly easy to make. With just a few affordable ingredients and zero baking time, you’ll have a stunning, crowd-pleasing dessert that looks like it came straight from a bakery.
Whether you stick to the classic cherry-topped version or get creative with your own flavor fusion, one thing’s for sure: every bite will taste like a little slice of heaven.